Overview
The Custom Car Agent is available as an add-on to your TireTutor plan. It generates a photo-realistic image of a customer's vehicle with a specific set of wheels. This guide walks you through the full five-step flow: entering the vehicle, choosing or adding a wheel, entering a tire size, generating the image, and sharing it with the customer. By the end you will be able to produce a visualization in about a minute at the counter or on your phone, save wheels into a catalog you can reuse, and send the customer a link they can open on their own device.
Before You Start
- You need the customer's vehicle year, make, model, and exterior color.
- You need an image of the wheel you want to show, unless the wheel is already saved in your catalog. A wheel image is mandatory — a new wheel cannot be saved without one.
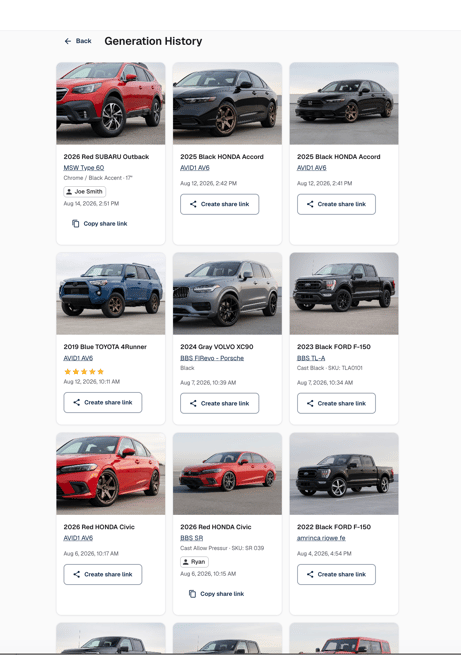
The header of every screen shows a Daily generations counter with the number of generations your shop has remaining for the day, and a History link that opens every image your shop has already generated.
Step 1: Head to AI Apps
You can find the Custom Car Agent by clicking on the left-hand menu and selecting "AI Apps". Then choose "Custom Car Agent."
.png?width=198&height=576&name=Random%20Mocks%20(8).png)
Step 2: Entering the Customer's Vehicle
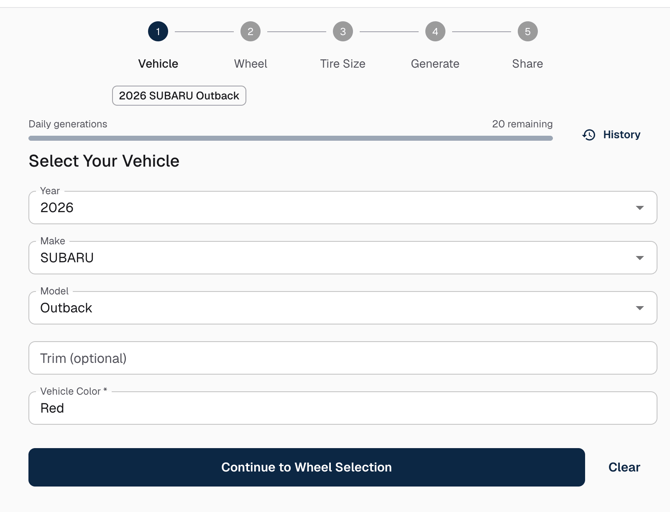
Open the Custom Car Agent and start on the Vehicle step. Select the year, make, and model of the customer's vehicle from the dropdowns, add the trim if you know it, and select the vehicle color.
Step 3: Choosing a Wheel From Your Catalog
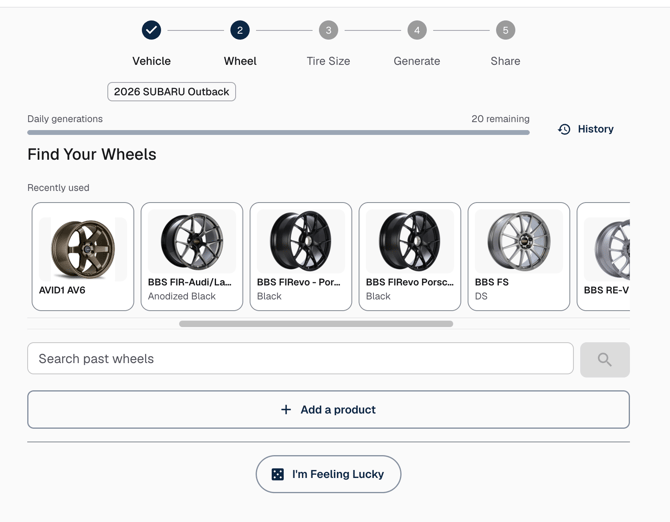
On the Wheel step, your shop's wheel catalog appears with the wheels you have used most recently at the top, under Recently used. The catalog is searchable, so if a customer asks about a wheel you have shown before, type the model name, for example Rev 7, and select it from the results.
If your shop is new to the Custom Car Agent, the catalog starts empty. It fills in over time as you add the wheels you sell and the wheels customers ask you about, so it becomes a library of the products that actually come up in your conversations.
If the customer has no specific wheel in mind, use I'm Feeling Lucky to have a wheel picked for them. This is useful when someone wants to see options but cannot name a brand or model.
Step 4: Adding a Wheel That Is Not in Your Catalog Yet
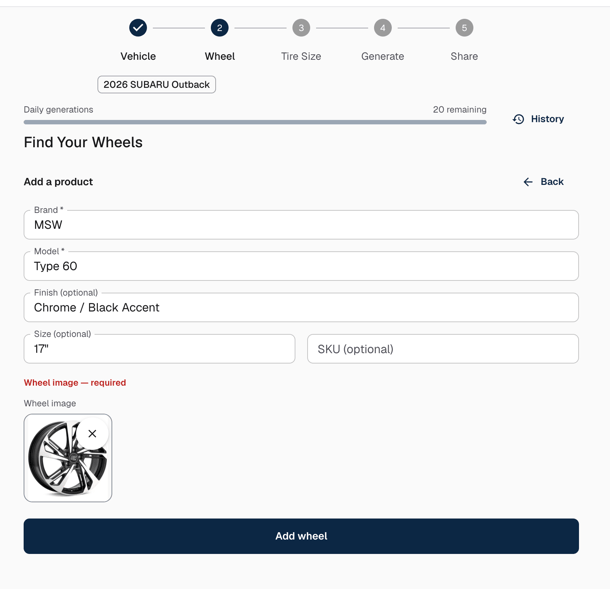
If the wheel the customer is asking about is not in your catalog, select Add a product on the Wheel step. Enter the Brand and Model, which are both required, and optionally the Finish, Size, and SKU. The optional fields are worth filling in when you have them, because they save with the wheel and make it easier to search for later.
Add the wheel image in the Wheel image area. You can drag an image straight from another browser tab, paste one you have copied, or click the box to upload a file through the normal file picker. A wheel image is mandatory — the form will not submit without one. Click Add wheel to save it to your catalog and use it for this visualization.
If you drag an image in and nothing appears to happen, the source website is blocking it. Tire Rack is the known example. Use the manufacturer's own site instead, or save the image to your computer and upload the saved file. On a phone, paste or upload the image rather than dragging it. Use images you have rights to use, such as your own product photos or images your supplier provided. Once you're done, click Continue.
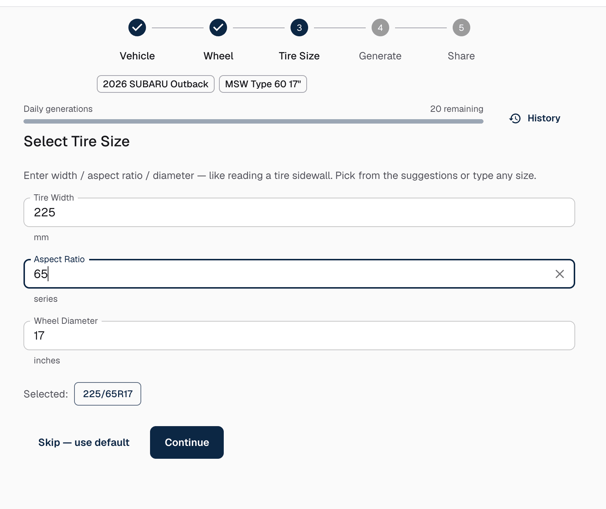
Step 5: Entering a Tire Size
On the Tire Size step, enter the tire size the customer is considering, for example 185/35R19. The tire size is optional and it is the only step in the flow you can skip. When you enter it, the generated image renders the sidewall in proportion to that size, so a low-profile setup looks like a low-profile setup. If you skip it, the image still generates and the proportions are approximate.
Click Continue to generate.
Step 6: Generating and Rating the Image
The image takes roughly 30 to 60 seconds to generate. When it finishes, the customer's vehicle appears wearing the wheels you selected, with the vehicle, wheel, and tire size listed above the image so you can confirm the configuration.
Use Rate this result to give the image a one-to-five star rating on how closely it matches the real wheel. The rating is feedback for the TireTutor product team, not a record of whether the customer liked the wheels.
If the image is not a good representation, click Regenerate to produce another attempt at the same configuration. Each regeneration consumes one of your shop's generations for the day.

Step 7: Showing a Second Wheel Option
The Custom Car Agent generates one option at a time and does not place two wheels side by side. To show a customer a second option, use the step tracker at the top to go back to the Wheel step, select or add a different wheel, and continue through to generate again. You can iterate through several wheels in one conversation, and every image you generate stays available in History, so you can flip back to an earlier option while the customer decides.
Sharing the Visualization With the Customer
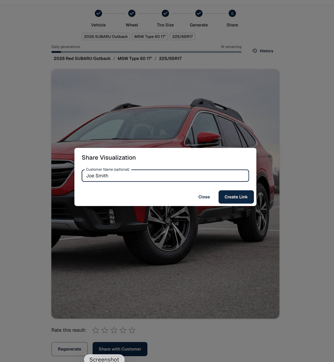
Click Share with Customer to create a shareable link. You can add the customer's name, which makes the link easier to identify later. Send the link by text or email, or paste it into the estimate's public notes.
The link opens a page titled Your Wheel Visualization, prepared in the customer's name. On that page the customer sees the generated image, a Download Image button so they can save it or show someone else, a Configuration Details panel listing the vehicle and the wheel, and a closing prompt asking whether they are interested in the look, pointing them back to your shop by name.
Sharing a visualization does not automatically attach it to the customer's record. If you want the image tied to a live deal, paste the link into the estimate's public notes.

Step 8. Finding an Image You Generated Earlier
Click History in the header from any step to see every image your shop has generated. Click any image to enlarge it. Images are listed over time, so you can pull up what you showed a customer yesterday, reopen it, or cycle through past renders to find the one you are thinking of. This is useful when a customer comes back a few days later to finish a decision, and when you want to reuse a configuration you have already dialed in.
.png?width=568&height=388&name=Random%20Mocks%20(9).png)