
Step-by-Step Guide: Managing Your TireTutor Website
Want this as a downloadable PDF for easy printing? Access it HERE.
Overview
This guide walks you through every part of the TireTutor CMS — the single dashboard where your website's pages, text, images, colors, services, and tire brands are managed. By the end you'll know where each type of content lives, how to change it yourself, and what happens on your live site when you save. Every TireTutor website is managed through this one CMS, so these steps apply whether you run a single location or several.
Step 1: Logging In to the CMS
When your site is ready for review, you'll receive an email with a staging link to preview the site, plus a login link to the CMS itself. Sign in at cms.website.tiretutor.co/admin/login using the email and password from your onboarding email. If you've forgotten your password, click Forgot password? on the login screen to reset it.
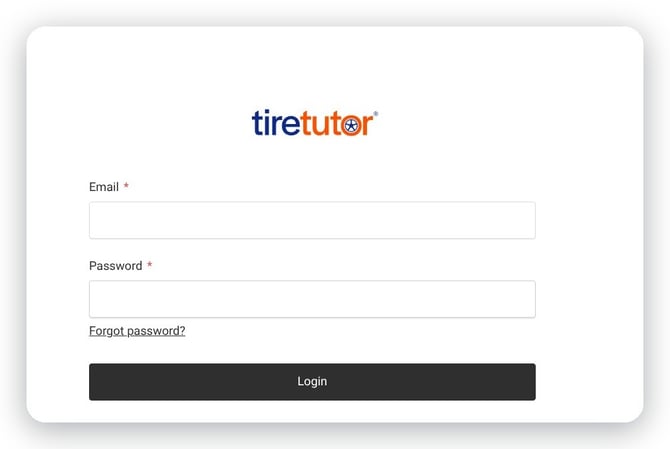 The CMS login page — sign in with the email and password from your onboarding email.
Step 2: Finding Your Way Around the Dashboard
Once you're logged in, the Dashboard shows every collection you can edit, organized into tiles: Users, Media, Sites, Domains, Pages, Navigations, Page Contents, Site Settings, Locations, Finance Options, Services, Service Areas, Blogs, FAQs, Reviews, Tire Brands, Job Postings, and Redirects. This same list repeats down the left-hand sidebar on every screen, so you're never more than one click away from any section.
Before you start editing, it's worth knowing that changes in the CMS save directly to your live website. There is no separate staging or preview step once your site is live, so double-check your content before clicking Save.
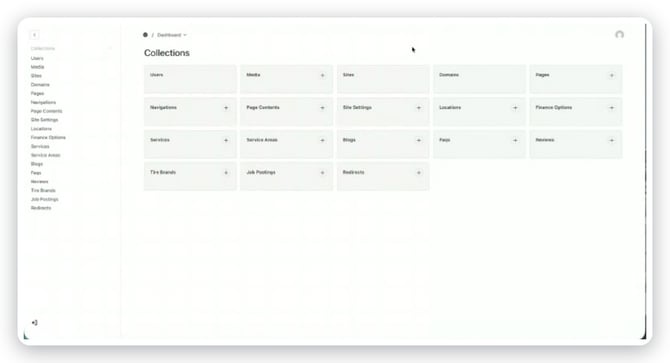 The CMS Dashboard — every editable collection, organized into tiles.
Step 3: Creating a New Page
Your website is built from pages, and you control which ones exist. Click Pages in the left-hand menu to see a list of all pages currently on your site, then follow these steps to add a new one — a seasonal coupon flyer or a dedicated rebates page, for example.
- Click Create New.
- On the General tab, choose your site under Select Site. This will usually be the only option.
- Enter a Page Title that includes your store name as it appears elsewhere on the site — for example, "Rebates – Portage Tire and Auto Repair."
- Set Type. Every site can have only one page of each type, and Home, Services, and the other standard types are reserved for the pages built during onboarding. Choose Custom for something new.
- Leave Enabled and Include in Sitemap checked so the page goes live and search engines can find it.
- Switch to the SEO tab. Click Generate Slug to auto-create the page's web address, then add a Meta Title (50–60 characters) and a Meta Description (150–160 characters). This is what shows up in a Google search result.
- Optional: under Custom Code, add header or footer script snippets if you're comfortable with code.
- Under Content, add your page content. You can type directly, or drag and drop a PDF — handy for a coupon flyer.
- Click Save. Your new page is now live on the site.
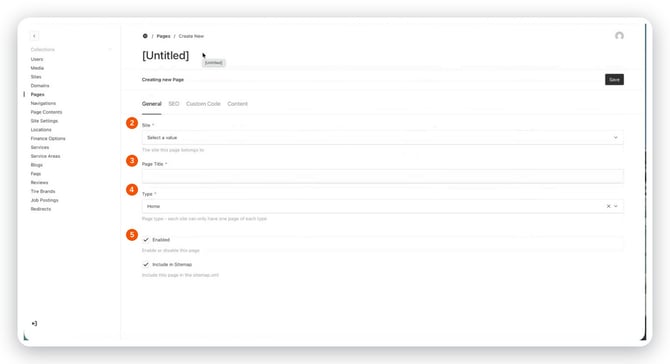 Steps 2–5 — the General tab: Site, Page Title, Type, and visibility toggles.
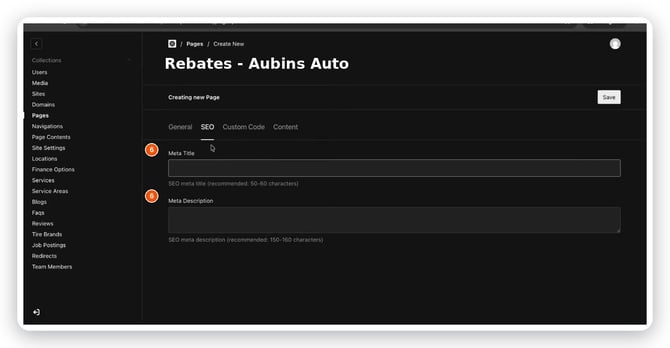 Step 6 — the SEO tab: Meta Title and Meta Description.
Step 4: Organizing Your Header and Footer Menus
Navigations controls what appears in your menus, in what order, and how it's grouped. Click Navigations in the left-hand menu and open the header or footer navigation to edit it. Each menu item has four fields:
- Label — the text customers see in the menu, for example "Warranty."
- Group — where the item lives. Top Level makes it a standalone link; choosing a category like Tires places it in that dropdown.
- Link Type — Internal Page links to a page on your site; External URL links out, for example to a partner site.
- Open in New Tab — check this for external links so customers don't navigate away from your site.
The same grouping options apply separately to the footer, so you can show a full menu up top and a shorter, curated list of links at the bottom.
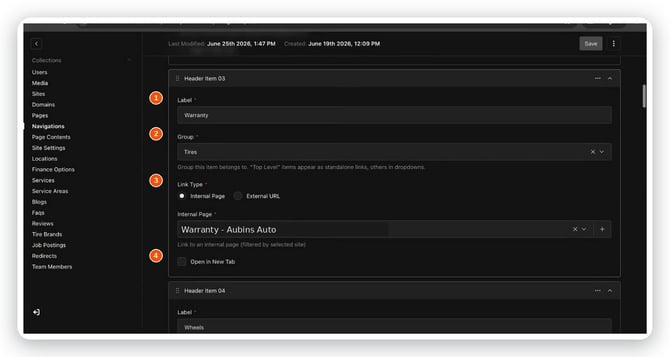 Editing a header menu item — Label, Group, and Link Type.
Step 5: Editing the Text and Images on an Existing Page
The words and images on your existing pages live under Page Contents, not under Pages. Clicking into an item under Pages only shows editable content if it's a custom page you created — pre-made pages like Home or Services appear blank there, because their content lives in Page Contents instead.
Each site has one Page Contents record, organized into two layers of tabs. The page tabs across the top cover Home Page, About Us, Services, Blog, Shop for Tires, Get a Quote, Reviews, Locations & Contact, FAQ, Rebates & Financing, Careers, Legal, and more, depending on your site. The section tabs below break each page into individual content blocks — the homepage, for example, has a Hero Section, How It Works, Certifications, and Trust Section.
Most sections include an Is Visible checkbox. Uncheck it to hide that section from the live site without deleting your content, so you can turn it back on later.
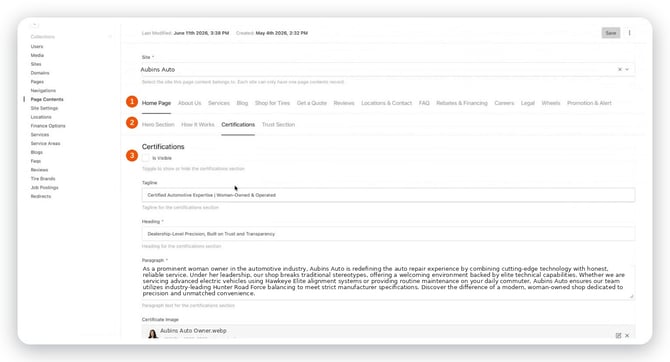 Page tabs (top) and section tabs (below) in Page Contents, plus the Is Visible toggle.
Step 6: Editing Your Homepage Hero
The hero is the large image and headline at the top of your homepage. To edit it, go to Page Contents, open the Home Page tab, and select Hero Section. You can change:
- Heading & paragraph — the hero text at the top of the page.
- Images — the hero background image, plus up to two additional images depending on the layout.
- Overlay Opacity — how dark the background image is dimmed, so heading text stays readable.
- Widgets & CTAs — which widgets appear, such as Shop for Tires or Get a Quote, and which call-to-action buttons show.
Keep headings short and clear. Descriptive, plain-language content helps search engines match your site to the searches real customers are typing.
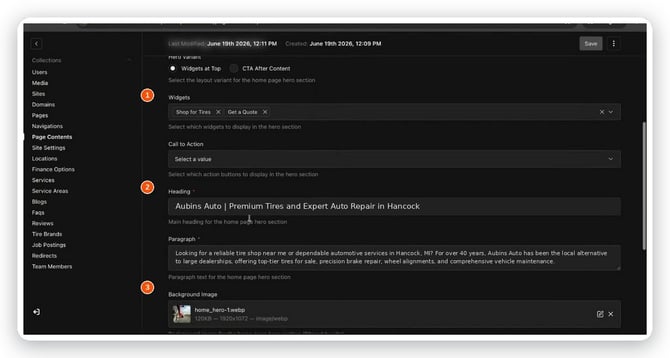 Editing homepage hero content — widgets, heading, paragraph, and background image.
 The same hero section as customers see it on the live site.
Step 7: Adding and Reordering Items in a Repeatable List
Some sections hold a repeatable list of items, each with its own heading and description — "Why Choose Us" is a common example. Open the section under Page Contents and use Collapse All or Show All to manage a long list more easily, then add or reorder items as needed.
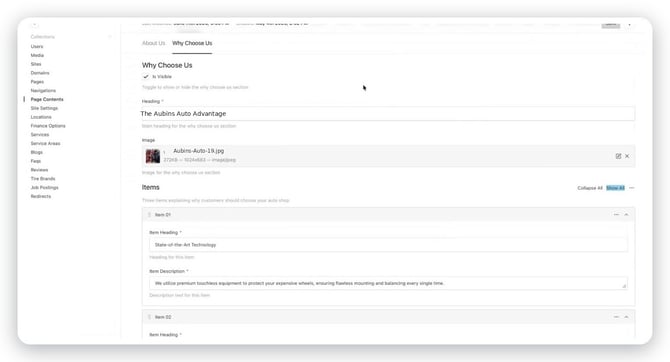 A repeatable "Items" block — each item has its own heading and description.
Step 8: Replacing an Image Without Changing It Everywhere
Do not use the small pencil (edit) icon to replace an existing image. Editing an image in place changes that image everywhere it's used across the site, which can cause unexpected changes on other pages.
Instead, click the X to remove the current image, then use Create New or Choose from Existing — or drag and drop a file — to add the replacement. When the upload window opens, make sure you select your specific site or store. If that field is left blank, the image is saved to a shared library instead of being tied to your site.
The CMS shows recommended dimensions and file size for each image slot. If your image is too tall, you may need to crop the height; if it's too wide, crop the width. Start with the best-quality original you have, since heavily edited or resized images can lose quality on mobile and desktop. Alt text can be whatever's useful to you — it does not meaningfully affect SEO.
Most customers will see your site on a phone, and a significant share of visits arrive outside business hours. Always preview how an image and page look on a phone-sized screen before you move on.
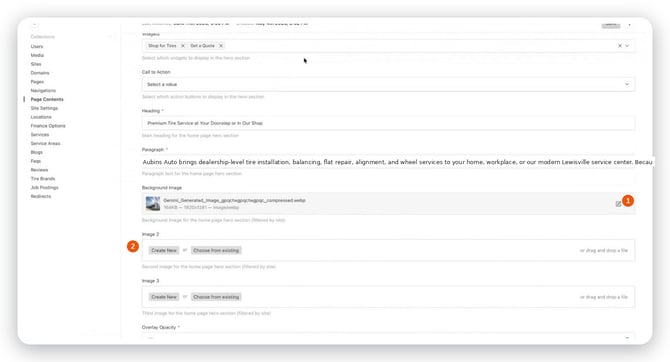 An empty image slot — use Create New or Choose from Existing rather than editing a shared image in place.
Step 9: Updating Your Logo, Theme, and Brand Colors
Your site's look and feel is managed under Site Settings, and you can update it yourself without a redesign request. Upload a new Logo any time you rebrand, or choose from the available color Themes with one click and click Save.
For more precise control than the preset themes, Site Settings also lets you set exact colors by hex code:
- Primary — your main brand color, used for buttons and header accents.
- Primary Foreground — the text color that sits on top of the primary color.
- Secondary — a secondary background color.
- Secondary Foreground — the text color on the secondary background.
- Accent — used for highlights.
If you don't know your brand's exact color, search your logo's "hex color code" online, or ask your TireTutor contact — many dealer sites are pre-matched to existing branding before launch.
If you want a more custom look, the Theme tab also lets you set background and text colors for individual sections. The About Us hero, Service Area section, and Blog hero can each have their own colors instead of inheriting the primary theme.
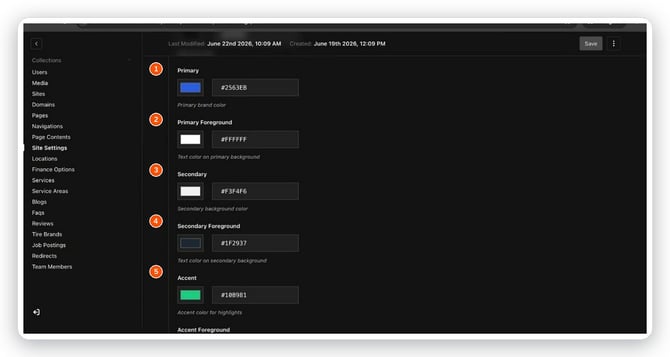 Setting exact brand colors by hex code under Site Settings.
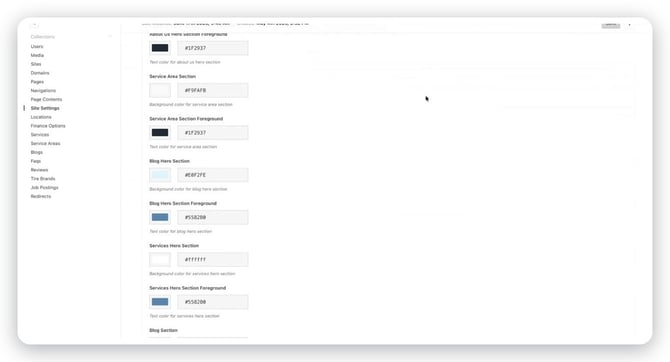 Advanced per-section color controls — each content section can have its own background and text color.
Step 10: Routing Form Submissions and Adding Social Links
Every lead that comes through your site depends on these settings being correct. Under Site Settings, open the Forms tab and set the email address that should receive submissions from your site's contact form, career/job application form, and dealer registration form. Each connects to a short form — first name, last name, email, and phone are required, and a resume upload is typically included for job applications.
Under the Social Media tab, add links to Facebook, Twitter/X, Instagram, LinkedIn, YouTube, and your Google Business Profile. These appear as icons on your site, typically in the footer.
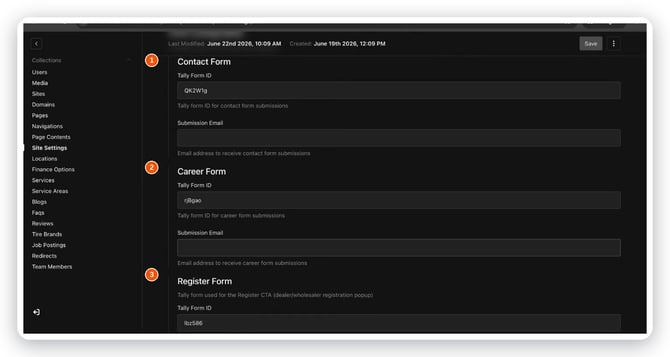 Setting submission emails for your Contact, Career, and Register forms.
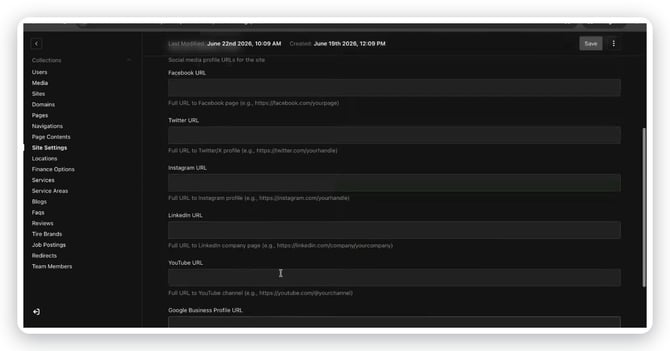 Adding social media profile links.
Step 11: Reviewing How Search Engines and AI See Your Site
Under Site Settings, the SEO & Analytics tab has an SEO sub-tab with a few fields worth understanding even if you never touch them:
- Google Site Verification ID — proves site ownership to Google Search Console.
- robots.txt Content — tells search engine crawlers which parts of your site they're allowed to visit.
- llms.txt Content — a plain-language business profile covering contact info, hours, services, and service area, written for AI systems and chatbots answering "best tire shop near me"-style questions. This is generated automatically.
You generally won't need to edit these directly. If something about your business changes — hours, services, address — flag it to your TireTutor contact so this profile stays accurate.
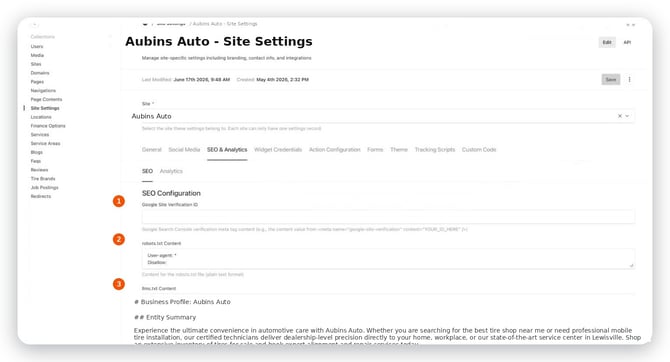 The SEO & Analytics tab, showing robots.txt and llms.txt content.
Step 12: Featuring the Tire Brands You Carry
The Tire Brands section controls which brand logos appear on your website — for example, in a "Featured Tire Brands" row on your homepage — and in what order. Click Tire Brands in the left-hand menu and open a brand to edit it:
- Featured Brand — toggle on to display the brand in the featured row; toggle off to hide it without deleting it.
- Display Order — set a number to control sort order. Lower numbers appear first.
Current rebates and promotions from major tire distributors are reflected on your site automatically, so you don't need to enter these yourself. If you want a specific brand highlighted that isn't already showing, let your TireTutor contact know.
If you're part of a manufacturer program — an affiliate Goodyear store, for example — your TireTutor contact can match your site's theme colors to that brand and prioritize its tires in your brand list and display order.
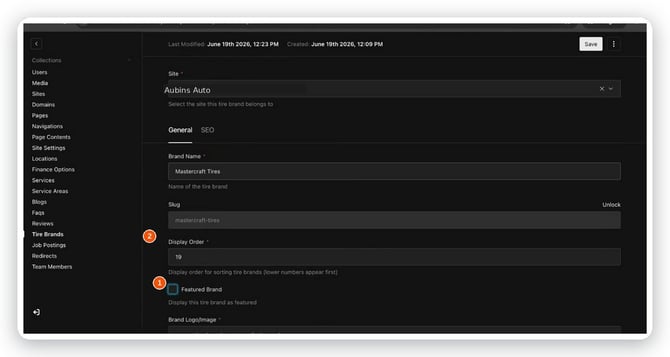 Editing a tire brand — toggle Featured Brand and set Display Order.
 Featured tire brands as they appear to visitors.
Step 13: Managing Your Services and Finance Options
Services and Finance Options are their own top-level collections in the left-hand menu. They're separate from the "Services" page under Page Contents, which controls the page's text rather than the list of services itself.
The Services list works like Tire Brands: each service has a Featured Service toggle to display it on the homepage, and a Display Order number, where lower numbers appear first. Click into an individual service to edit it. Each one has General, Detail Page, and SEO tabs covering the service name, a locked auto-generated slug (click Unlock to change it), display order, the featured toggle, a service image, and a card description shown on the homepage.
If you offer financing, a credit card program, or a service like Afterpay, manage it under Finance Options. Like Services and Tire Brands, each option has a Display Order so you can control which financing offer shows first.
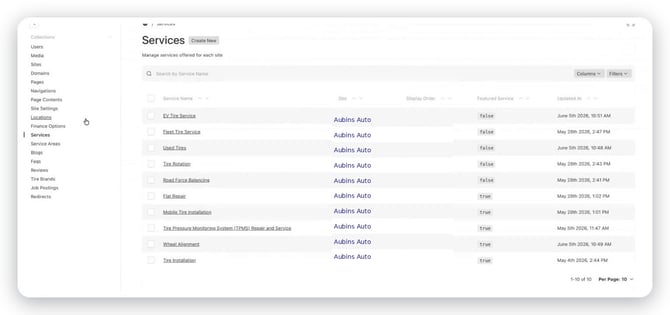 The Services list — Display Order and Featured Service columns.
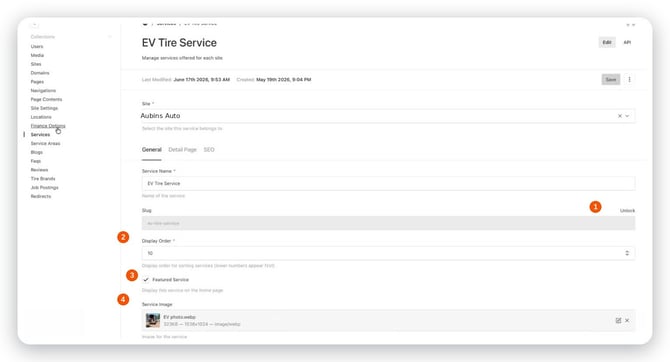 Editing an individual service — name, slug, display order, featured toggle, and image.
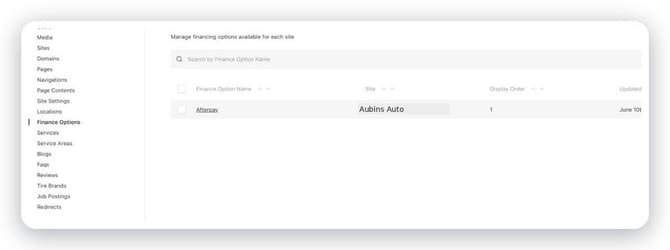 The Finance Options list.
Step 14: Adding Team Members and Job Postings
Use Team Members to build out your "Meet the Team" section — add the owner, long-term employees, or anyone you'd like customers to recognize. Once a team member is added here, their bio and photo can be placed on your About Us page through Page Contents.
If you're hiring, Site Settings > Forms lets you set the submission email for job applications. The application form can include fields such as first name, last name, email, phone number, and a resume upload, and submissions land directly in your inbox to follow up on.
Step 15: Keeping Service Areas, Blogs, and FAQs Current
Your site automatically populates a list of nearby towns as service areas. Review this list with your TireTutor contact — occasionally a non-town entry, like an apartment complex, is picked up by mistake and should be removed.
Use Blogs to publish articles — a seasonal series on switching between winter and summer tires, for example, or the benefits of a specific tread type. Use FAQs to answer common customer questions directly on your site. Both help customers, and search engines, find useful and specific information about your shop.
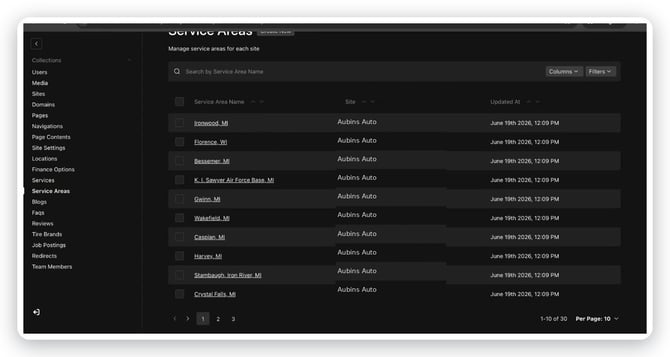 The list view used across sections like Service Areas and Job Postings.
Getting More Help
You now have control over the pages, text, images, colors, services, tire brands, and menus on your website, and you don't need to wait for a call to make most changes. If you run into something this guide doesn't cover, or you'd like a walkthrough with a member of the team, reach out to your TireTutor contact to schedule time.