
Tipping is off by default for every shop. Nothing changes for your customers until you turn it on, and you can turn it on in one place without turning it on in the other.
Terminal tipping asks the customer for a tip on the physical card terminal at the counter or in the van. Text-to-pay tipping adds a tip option to the invoice page a customer opens from the payment link you send them. Many shops want one and not the other. A mobile operation that takes payment at the customer's driveway may want tipping on the terminal only, while a shop that invoices most work may want it only on text-to-pay.
Step 2: Turning On Tipping at the Payment Terminal
First, toggle on the setting in the Shop Management System by going to Settings --> Tipping and toggling on the button.
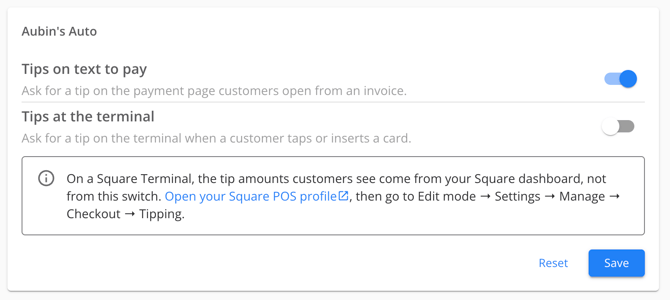
Follow the link in the settings and go to Edit mode --> Settings --> Manage --> Checkout --> Tipping.
Select the mode for the terminal you want to change, then click Manage. Find the Tipping section and enable it. Save your changes.
Once tipping is enabled for that mode, any card payment taken on a terminal using it will show tip options to the customer before the payment completes. A terminal whose mode does not have tipping enabled continues to take payments exactly as it does today, with no tip prompt.
Step 4: Setting the Tip Percentages Shown at the TerminalThe percentage options your customer sees at the terminal come from your Square configuration, not from TireTutor. Enabling tipping in TireTutor controls whether the terminal asks for a tip; Square supplies which percentages appear on the screen.
Step 5: Turning On Tipping for Invoices and Text-to-PayTipping on invoices is controlled by its own setting, separate from the terminal setting in Step 2. Turning on tipping for your terminal does not add a tip option to your invoices. Head to your settings and then click on "tipping".
Enable tipping for text-to-pay in your payment settings and save. Once it is on, the tip option appears on the invoice payment page for your shop. If you do not enable it, customers paying an invoice online see the payment page exactly as they do today, with no tip option.
Step 6: What Your Customer Sees at the TerminalWhen you take a card payment on a terminal with tipping enabled, the terminal presents tip options to the customer as a set of percentages before the payment is authorized. The customer chooses one, or continues without adding a tip, and the payment completes as normal.
If the customer pays with a legacy swipe rather than a tap, the terminal also asks them to sign. That signature is captured and preserved on the receipt in Square. Tap-to-pay transactions do not ask for a signature.
Step 7: What Your Customer Sees on a Text-to-Pay InvoiceWhen you send an invoice to a customer and text-to-pay tipping is enabled, the customer opens the payment page from the link and sees a percentage selector alongside the amount due. The customer chooses a percentage to add a tip, or pays the invoice amount without one, and completes the payment the same way they always have.
The tip is a percentage selection rather than a free-text amount box. This is deliberate: it keeps the tip visually distinct from the amount the customer is paying, so there is no ambiguity about what is being charged.
You can now switch tipping on for your terminal, for your text-to-pay invoices, or for both, and you can change your mind at any time without affecting how payments otherwise work. This is the first release of tipping in TireTutor and more configuration options are planned. For anything you want set up differently in the meantime, contact your customer success representative to request this feature.