
Set your own tire pricing strategy — from distributor markups to installation fees — so every tire in your catalog is priced the way you want to go to market.
Step-by-Step Guide: Managing Tire Markups
Overview
This guide walks through the Tire Markups settings in the TireTutor.ai Shop Management System. By the end, you'll be able to enable your distributors and set a markup on each one, choose the pricing scheme that selects your base price, control which brands appear in your catalog and what markup each carries, and add rule-based markups for tire price, installation, and run-flat surcharges. These settings determine the sell price shown in your in-store tire catalog and on your online marketplace listings.
Step 1: Opening Tire Markups
Open Shop Settings in the left-hand pane of the TireTutor.ai Shop Management System and select Tire Markups. You need an admin login to access this area. You'll see four tabs that work in order: 1. Distributors, 2. Pricing Scheme, 3. Brands, and 4. Custom Markups. Once your distributors are set up, the system opens to the Custom Markups tab by default, since that's where most day-to-day adjustments happen.
Step 2: Enabling Distributors and Setting Distributor Markups
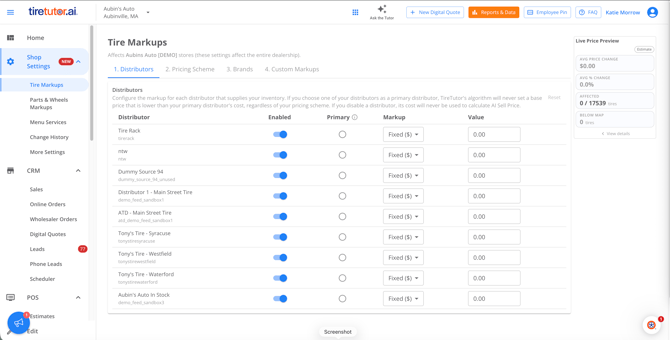
On the 1. Distributors tab, switch on Enabled for each distributor you source tires from. Disabled distributors are ignored when pricing your catalog, and at least one distributor must be enabled. For each enabled distributor, choose a markup type — Fixed ($) or Percentage (%) — and enter a value. The markup is applied to that distributor's cost before your pricing scheme runs.
If you keep tires in stock at your shop, your own in-stock inventory feed appears in this list under your shop's name and works like any other distributor. A markup of zero is a valid choice — for example, you may not want to mark up tires supplied by a sister store in your own organization.
If you never want your prices to fall below a particular source's cost, mark that distributor as Primary. The primary distributor sets a price floor: your SKUs won't price below that distributor's cost after its markup, regardless of your pricing scheme. At most one distributor can be primary, and the floor is ignored for any tire the primary doesn't have in stock. A common setup is marking your own in-stock inventory feed as primary so you never undersell the prices you set on tires you already own.
Step 3: Choosing a Pricing Scheme
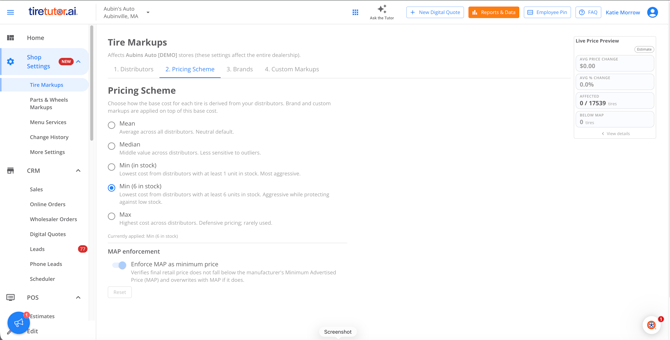
On the 2. Pricing Scheme tab, choose how the system selects your base price from your enabled distributors' marked-up prices. The options are Min, Min 6, Mean, Median, and Max.
Min takes the lowest marked-up price from any distributor with at least one unit in stock. Min 6 takes the lowest marked-up price from distributors with at least six units in stock — enough for a standard set of four tires plus a buffer of two, since distributor inventory counts fluctuate. Min 6 protects you from advertising a price based on a source that can't actually deliver a full set, and it's a good fit for most medium- and high-volume shops that rely on scheduled distributor deliveries. Standard Min fits shops in highly competitive markets, shops that actively pick up tires from multiple distributors to complete sets, and lower-volume or specialty shops that often sell one or two tires at a time.
If no enabled distributor has at least six units of a tire, that tire may not receive a computed sell price or appear in your catalog under Min 6. If you frequently sell hard-to-find or specialty tires, choose Min instead.
If your shop is on a legacy custom pricing configuration, this screen shows your scheme as Custom and the self-serve markup settings are disabled. Contact your customer success representative to move to a supported pricing configuration.
Step 4: Configuring Brands and Brand Markups
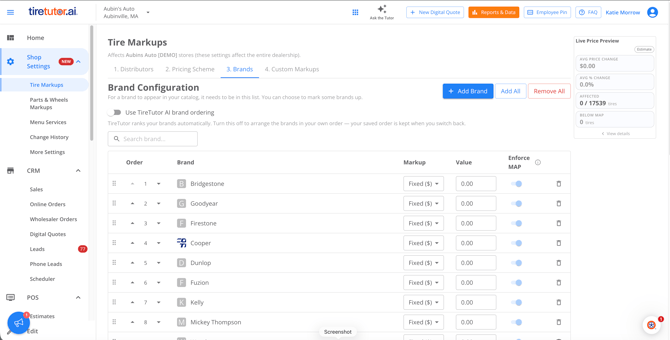
On the 3. Brands tab, control which brands appear in your catalog and what additional markup each brand carries. Only brands listed on this tab appear in your catalog — if a brand has no row, its tires won't show even when your distributors stock them. Click Add all to list every brand, which is the typical setup, or remove all and add back only the brands you sell if you deliberately run a narrow catalog. A brand with a zero markup still appears in your catalog at its base price.
Brand markups can be a fixed dollar amount or a percentage, and they're applied on top of the base price calculated from your distributors and pricing scheme. A brand markup is useful where you have an edge on a brand — for example, if you're the only shop in your area carrying a premium brand customers ask for.
If you want to control the order brands appear in on your online marketplace, switch off the Use TireTutor AI brand ordering toggle and drag brands into your preferred order. By default, TireTutor's AI orders your marketplace listings automatically based on value for money, brand reputation, and the shopper's distance from your store; your in-store catalog sorts by price, lowest first by default. Manual ordering is useful when manufacturer or distributor programs reward unit volume on a specific brand, or when you simply prefer to lead with brands you trust. Your saved manual order is remembered if you switch the AI ordering back on and return to it later.
Step 5: Adding Custom Markup Rules
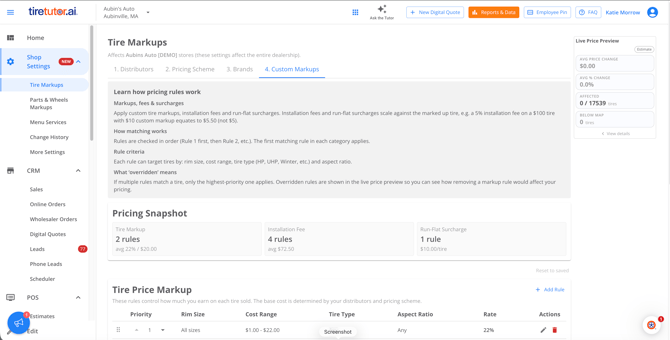
On the 4. Custom Markups tab, build rules in three separate sections: Tire Price Markup (margin added to the tire itself), Installation Fee (labor charged per tire for mounting and balancing), and Run-Flat Surcharge (an extra charge for run-flat tires). Click Add Rule in a section to create a rule. Each rule can target tires by rim size, cost range, tire type (HP, UHP, Winter, etc.), and aspect ratio, and applies either a fixed dollar amount or a percentage.
Within each section, rules are evaluated in priority order from the top of the list. The first rule a tire matches is the one that applies — every rule below it in that section is skipped. Drag a rule up or down to change its priority. For example, if rule 1 adds $60 for rim sizes 20 inches and above and rule 2 adds $70 for tires costing $100–$150, a 20-inch tire costing $125 gets the $60 markup only, while a 19-inch tire costing $125 gets the $70 markup.
If a tire matches no rule in a section, no markup from that section is applied. To avoid unpriced gaps, add a catch-all rule at the bottom of the list — any size, any cost range — with your default markup. Tires that fall through your specific rules then receive your default markup instead of none.
Tire price markups and brand markups are each calculated on the base price and added together — they don't compound on each other. The result is then raised to the manufacturer's Minimum Advertised Price (MAP) if it falls below it, which gives the tire's unit price. Installation Fee and Run-Flat Surcharge rules are evaluated against that unit price and added on top.
Step 6: Previewing and Saving Your Changes
Before saving, review the Pricing Snapshot at the top of the Custom Markups tab and the Live Price Preview panel on the right. The preview shows what your unsaved changes would do across your inventory: the average price change, how many tires are affected, and how many would sit below MAP. You can also open the inventory preview to see how your markups land on specific tires. When the numbers look right, click Save changes. If you want to discard unsaved edits, click Reset.
Once your distributors, pricing scheme, brands, and custom markup rules are in place, the system prices every tire in your catalog automatically and keeps prices current as distributor costs and stock change throughout the day. You can return to Tire Markups any time your sourcing, programs, or local market shifts. If you'd like help choosing a starting configuration for your market, contact your customer success representative.