
Step 1: Turning on your service categories
To make sure you can see the service categories, and therefore gauge the utilization of your bays, you'll need to first set up service categories in your settings. Head to your Settings and open the Service Categories section. Three categories are available: Tire, General Service, and Alignment. Switch on the ones your shop runs.
.png?width=670&height=316&name=Random%20Mocks%20(10).png)
Service categories start switched off for every account, and until at least one is on, every appointment on your calendar appears gray with no color coding. Turning them on is what makes the calendar readable at a glance.
If you don't see the option to switch a category on, you may not have admin access and the page will be read-only. Contact your customer success representative to request this feature.
Step 2: Assigning a Service Category to a Work OrderOpen the work order and choose its service category. New work orders start as Unassigned until you pick one.
.png?width=670&height=419&name=Random%20Mocks%20(11).png)
Once you assign a category, the appointment picks up that category's color on the calendar. If you leave a work order as Unassigned, it still appears on the calendar, but it will show without a category color.
Step 3: Choosing a Calendar ViewOpen Scheduler from the main menu. On a desktop you have four views: Month, Week, Day, and List. On a phone, the footer gives you Day and List.
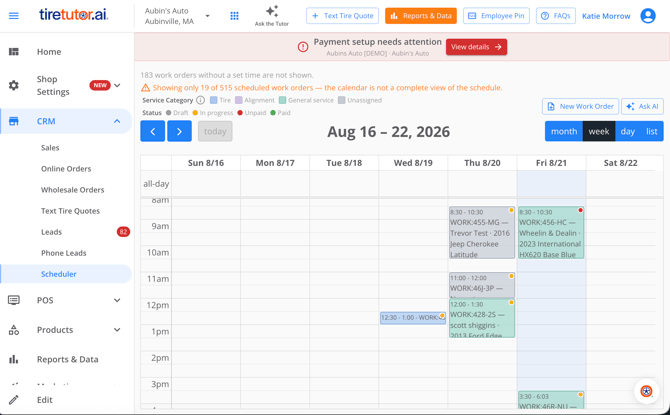
Day view is the standard choice for running the shop — it shows the hour-by-hour picture, with overlapping jobs side by side, so you can see how many cars are coming in during a given hour. Week view is useful when a customer asks about later in the week. List view strips out the grid and shows everything in a single sequence, which is often the fastest way to read a busy day on a small screen. Month view gives you the long view for planning.
Step 4: Reading the Colors on Your CalendarThe calendar uses two separate sets of colors, and there are two legends at the top of the view to match.
The first set is your service category — tire, general service, or alignment — so you can tell at a glance what kind of day you're looking at. A screen full of one color means a heavy day of that type of work, which is your cue to offer a customer a later slot rather than promising same-day.
The second set is work-order status. Status colors follow the familiar traffic-light convention, with in-progress work shown in yellow.
When two or more appointments fall in the same time slot, they appear side by side in that slot to account for multiple bays for the same service category.
Step 5: Opening an AppointmentClick or tap any appointment on the calendar. A panel opens with the work-order details for that job.
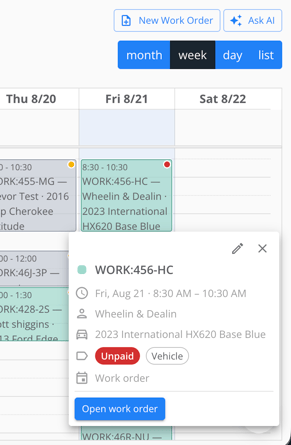
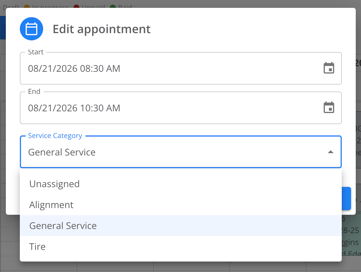
From here you can change the appointment's start and end time, or select Open Work Order to go straight to the full work order. Use this panel when you want to check what a job actually is without leaving the calendar. Click the pencil icon to edit the start or end time and to update the service category.
Step 6: Rescheduling an AppointmentOn a desktop, drag the appointment to a different time slot or a different day. The work order updates to match — you don't need to open it separately and change the time again.
If the appointment came in as an online order, you won't be able to drag it. See Step 8 for how to handle those.
Step 7: Changing How Long an Appointment TakesAppointment length is set from the labor hours already on the work order. If a job has no labor hours on it, the appointment defaults to one hour.
To change the length from the calendar on a desktop, drag the bottom edge of the appointment up or down. To change it from a phone, tap the appointment and adjust the end time in the panel.
Step 8: Working with Online Orders on the CalendarOnline orders appear on the calendar at their requested slot, alongside your work orders, so you can see them coming without going to look for them.
Online orders are read-only until you act on them. You can't drag one to a different time. To turn one into a job you can schedule and edit, open the appointment and select the option to convert it to a work order. Once it's a work order, it behaves like any other appointment — you can move it, resize it, and assign it a service category.
Step 9: Asking AI About Your ScheduleSelect Ask AI on the calendar to open the assistant panel. You can type a question about your schedule, such as how many alignments you have booked today or what your Thursday looks like, and it will answer from your calendar.
Step 10: Understanding Why the Calendar Shows Your Shop's TimeThe calendar always shows appointments in your store's own time zone, no matter where the person looking at it happens to be. If you're travelling and open the calendar from another state, an 8 a.m. appointment still reads as 8 a.m. at the shop. The work-order screen behaves differently — it shows times based on the device you're using.